The Complete Guide to Proper V-Belt Tensioning
This guide explains why tensioning matters, how Bestorq belts are designed differently, and steps for achieving perfect tension.

Optimizing Belt Drive Life with Tensioning
Why proper belt tensioning matters and how it affects belt life
To get the most from your belt drive, pay proper attention to your V-Belt tensioning and pulley size.
Correct belt tension is one of the most critical factors in achieving maximum performance and service life from your V-Belt drive system. Too loose, and you risk slippage, heat build-up, and premature wear. Too tight, and you can overload bearings, reduce efficiency, and damage components. However, there is still a wide range of tension which a belt will operate satisfactorily.
This guide explains why tensioning matters, how Bestorq belts are designed differently, and step-by-step methods for achieving perfect tension every time.
Optimizing Belt Drive Life with Proper Tensioning, Not Based on “Feel”
Correct belt tension is one of the most critical factors in achieving maximum performance and service life from your V-Belt drive system. Too loose, and you risk slippage, heat buildup, and premature wear. Too tight, and you can overload bearings, reduce efficiency, and damage components. The goal is to use the lowest tension that can reliably carry the load without slipping under peak conditions.
V-belts operate on friction, multiplied by the wedging principle. How you tension a belt at installation largely determines how long it will last. Belt tensioning also impacts bearing life — loose belts slip and generate heat, leading to hot bearings and shorter bearing life.
The Goal of Proper Belt Tensioning
The objective is simple:
- Use the lowest tension that can reliably carry the load
- Avoid belt slip under peak load
- Maintain optimal load distribution across the drive
Why Belt “Feel” Can Be Misleading
Belt “feel” is not a reliable way to judge proper tension. Differences in materials and tensile cords mean that two correctly tensioned belts can feel completely different — some brands use spongy tensile members that feel soft even at correct tension, while others feel rigid yet may still be too loose.
Bestorq belts use a high-modulus tensile cord, which requires 1.5–1.8× more apparent tightness than many “spongy” competitor belts. In a test of over 200 experienced maintenance personnel, only 1% achieved correct tension by feel alone; most were at just 7%–50% of the required tension.
Tension loss also occurs on all belts after installation. Even top-quality belts can lose nearly 50% of their installed tension, while lower-quality belts can lose over 70%. This makes proper initial tensioning and periodic re-checks essential for maximum belt life and performance.
Avoiding Installation Damage
Rolling or prying a belt on a drive gives one of two results, both lead to shortened belt life. Rolling causes low belt tension resulting in low belt life due to slip and heat build up. Prying a belt damages cables in the belt, leading to early belt failure.
Tip: Use the proper tools and step-by-step tensioning methods for both V-belts and timing belts to ensure long, reliable operation.
Common Belt Tensioning Methods
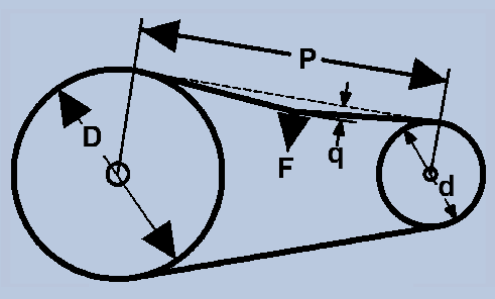
1. The Force-Deflection Method
A widely used standard in the V-Belt industry:
- Measure the span length (P) – distance between pulley centers along the belt.
- Calculate deflection amount – 1/64″ of belt span per inch.
- Example: If span = 32″, deflection = 32/64″ (½″).
- Apply the recommended force (F) at the span midpoint.
At center of the span length apply a force F (using a belt tension gauge) perpendicular to the belt span, large enough to deflect the belt 1/64” for each 1“ of belt span, q. So, for a 32” span, the deflection amount would be 32/64” or 1/2”. - Compare force to chart values – adjust tension until correct.
Tip: For banded belts, multiply the force value by the number of ribs.
2. Using the Elongation Method
For higher accuracy and repeatability:
- Find the elongation factor – consult the elongation factor chart for your belt cross-section, type, and smallest pulley diameter.
- Measure the free length – with no tension applied, wrap a non-stretch steel tape around the belt to measure its outside length.
Tip: Never use string—it will stretch and give inaccurate results. - Calculate the tensioned length – multiply the free length by the elongation factor to get the tensioned length.
- Install and tension the belt – mount the belt, then tighten until its measured outside length equals the calculated tensioned length.
Learn more about the elongation tensioning method
Minimum Recommended Pulley Diameters
The successful operation of a belt drive is highly dependent on the diameter of the pulleys involved.
The ARPM (Association for Rubber Product Manufacturers) publishes minimum recommended pulley diameters for each belt profile. Using pulleys smaller than these recommended diameters will result in a dramatic increase in belt tension and will substantially decrease the overall belt life.
*4L at this diameter has HP rating below 1/2 HP
| Belt Type | Pitch Diameter | Outside Diameter |
|---|---|---|
| 4L* | 2.30 | 2.50 |
| A | 3.00 | 3.25 |
| AX | 2.20 | 2.45 |
| B | 5.40 | 5.75 |
| BX | 4.00 | 4.35 |
| 3V | 2.65 | 2.65 |
| 3VX | 2.20 | 2.20 |
| 5V | 7.10 | 7.10 |
| 5VX | 4.40 | 4.40 |
Pro Tips for Bestorq V-Belt Tensioning
- Never rely solely on “feel.” Use proper measuring methods.
- New belts may require slightly higher initial tension than used belts.
- Always tension banded belts based on force per rib.
- For best performance, use Bestorq’s Tension Stick or Tension Gauge tools.
- Once properly tensioned, Bestorq belts maintain tension exceptionally well, reducing the need for frequent rechecks.